 Save to Pinterest
 My daughter came home from school buzzing about a Fourth of July party, and I found myself standing in the kitchen that evening, staring at three boxes of Jello and wondering how to make something that looked as excited as she felt. These layered cups caught my eye, and I realized that making dessert wasn't just about the taste—it was about creating something that made people smile the moment they saw it. The precision required to stack the layers felt almost meditative, like building tiny edible monuments to summer itself.
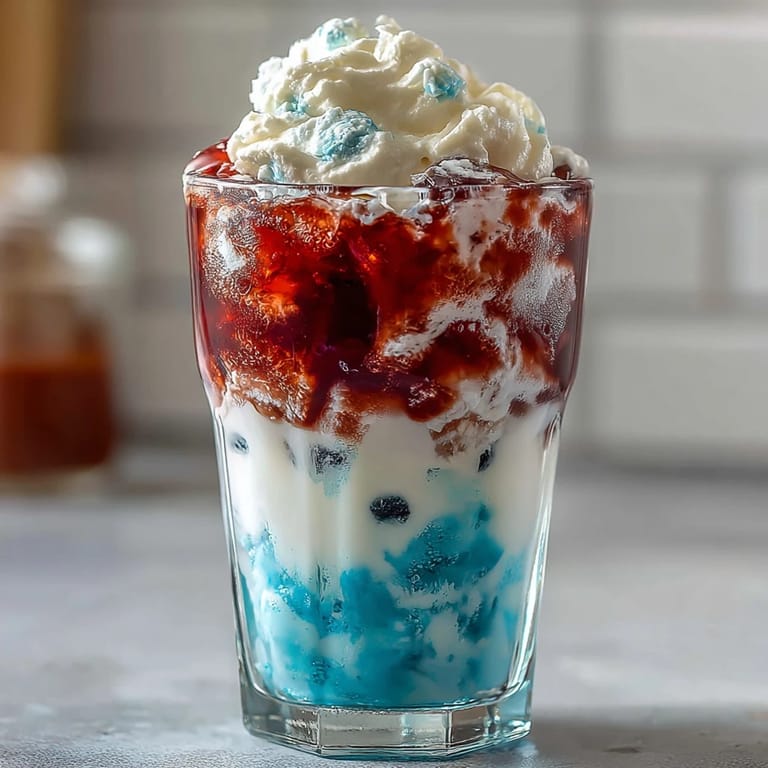
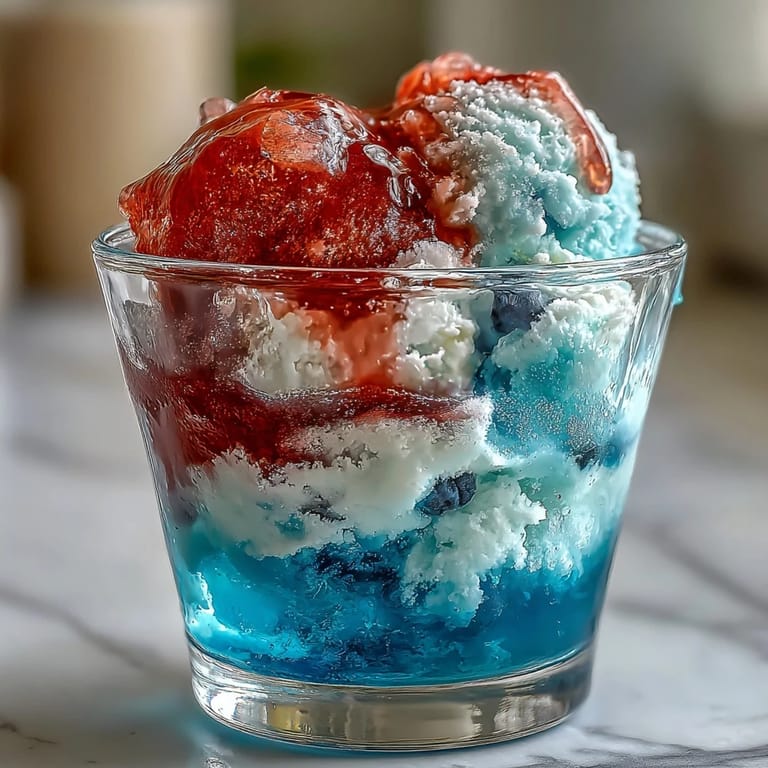
I'll never forget pulling these cups out of the fridge just before the fireworks started that July evening, watching my daughter's face light up when she saw the bright red, white, and blue stripes catching the light. Her friends crowded around, each wanting to know how something so beautiful could be so simple, and suddenly I wasn't just serving dessert—I was part of making the whole celebration feel special and intentional.
Ingredients
- Red Layer Jello (3 oz box): Strawberry or cherry creates that jewel-toned red you need; the flavor matters less than the color here, so pick whichever you prefer.
- Boiling water for red layer (1 cup): Hot water dissolves the Jello completely and prevents lumps that'll ruin your pretty stripes.
- Cold water for red layer (1/2 cup): This cools the mixture quickly so it sets up without melting into the next layer you'll add.
- Unflavored gelatin (1 envelope): This creates that creamy white middle layer with way better texture than plain condensed milk alone.
- Cold water for white layer (1/2 cup): Gelatin blooms in cold water first, which helps it dissolve smoothly into the hot water without clumping.
- Boiling water for white layer (1/2 cup): Just enough heat to fully hydrate the gelatin without cooking off the delicate flavor.
- Sweetened condensed milk (1 cup): This is what makes the white layer silky and creamy, plus it adds just enough sweetness to balance the flavored layers.
- Blue Layer Jello (3 oz box): Blue raspberry is traditional, but use whatever blue flavor calls to you—it's the top layer, so everyone sees it first.
- Boiling water for blue layer (1 cup): Same principle as the red layer—dissolve completely to avoid grit in your final masterpiece.
- Cold water for blue layer (1/2 cup): Brings the temperature down and gives you the right consistency for pouring.
- Whipped cream and fresh berries (optional garnish): These add freshness and visual pop right before serving, though the cups shine perfectly on their own.
Tired of Takeout? 🥡
Get 10 meals you can make faster than delivery arrives. Seriously.
One email. No spam. Unsubscribe anytime.
Instructions
- Gather your cups and set up:
- Line up eight clear cups and grab that muffin tin if you have one—you'll use it to hold the cups at an angle for the first layer. This tilt matters because it gives you more surface area for each layer to set properly.
- Create the red base:
- Boil your water, pour it over the red Jello, and stir until every bit of powder dissolves completely, then add the cold water and stir again. Divide this evenly among your cups, about two tablespoons each, then nestle them into the muffin tin so they're tilted and pop them into the fridge for 45 to 60 minutes until the surface feels firm to the touch.
- Build the white layer:
- Sprinkle that unflavored gelatin over the cold water and let it sit quietly for five minutes—this blooming step is non-negotiable because it helps the gelatin dissolve without turning grainy. Pour in the boiling water, stir until silky smooth, then add the sweetened condensed milk and give it a good whisking until everything's combined, then let it cool to room temperature so it doesn't melt your red layer.
- Layer the white on top:
- Once your red layer is set, pour the white mixture slowly and carefully down the inside of each cup, about two tablespoons per cup, then stand the cups upright and chill for another 45 to 60 minutes. Watch for any cracks or unevenness as you pour—if the white layer starts slipping, it means your red layer isn't quite set enough yet.
- Make the blue finish:
- Dissolve the blue Jello in hot water just like you did with the red, add the cold water, and let it cool completely to room temperature before you even think about pouring it. This cooling step prevents the blue from melting through the white layer and ruining all your careful work.
- Complete the tower:
- Pour the blue Jello gently over the white layer, again about two tablespoons per cup, and refrigerate upright for at least two hours, though overnight is even better. You'll know they're ready when the blue layer jiggles just slightly but doesn't slosh around.
- Finish and serve:
- Just before serving, top each cup with a dollop of whipped cream and scatter some fresh berries on top if you're feeling fancy. The contrast of cold Jello, cool whipped cream, and fresh fruit makes every bite feel like a celebration.
 Save to Pinterest
 There's something almost magical about watching someone's eyes travel down through the layers of these cups, each one a different bright color stacked perfectly on top of the last. It's the kind of dessert that makes people feel like you spent way more time on them than you actually did, which honestly makes them my favorite thing to bring to any summer gathering.
The Temperature Dance
Temperature control is everything in this recipe, and I learned this the hard way after my first attempt turned into a color-swirled mess that tasted fine but looked like something had gone very wrong. The trick is understanding that hot mixture poured over a set but still-cold layer will start to melt it, which is why each new layer has to come down to room temperature first. I now keep one hand on the mixture while I pour with the other, ready to stop if I feel any resistance, which tells me the layer below isn't quite ready yet.
Why Clear Cups Matter More Than You'd Think
Using clear cups instead of bowls or opaque containers completely transforms this recipe from a nice dessert into a showstopper, and I found myself understanding this only after making a batch in random mugs for a casual dinner. The whole point is seeing those vibrant layers stacked up like little edible art projects, so don't skip the clear cup requirement if you want the full effect. Honestly, it's worth grabbing some nice ones from the dollar store if you don't have them at home, because the presentation is half the fun.
Flavor and Flexibility
While the red, white, and blue combo is perfect for patriotic occasions, I've experimented with other flavor combinations that work just as beautifully and honestly taste even better. Strawberry, white, and lime layers give you the same visual effect but a completely different flavor profile, or try raspberry, white, and blackberry if you want something that feels a bit more grown-up and sophisticated. The method stays exactly the same, but the flavor experience changes entirely.
- You can absolutely make these dairy-free by swapping the sweetened condensed milk for coconut milk mixed with a bit of sugar, and the texture comes out surprisingly creamy.
- If you're in a time crunch, you can speed up the chilling by using smaller portions per layer, though you'll lose the visual drama of thick stripes.
- Make these the day before if you want to remove all stress from your party day—they actually taste better after 24 hours as the flavors meld together slightly.
 Save to Pinterest
 These cups have become my go-to summer dessert, the kind of thing that makes people ask for the recipe even though they're shocked at how simple it really is. There's real joy in creating something beautiful and festive that actually comes together in your own kitchen, and these layered Jello cups deliver exactly that feeling.
Recipe Frequently Asked Questions
- → How do I get the layers to stay separate?
Allow each layer to fully set and chill before adding the next. This prevents colors from mixing and keeps sharp, defined stripes.
- → Can I substitute the condensed milk?
Yes, dairy-free alternatives like coconut milk and sugar can replace sweetened condensed milk for a dairy-free version.
- → What is the best way to chill the cups at an angle?
Using a muffin tin or similar holder keeps cups tilted during chilling, helping create angled layers for visual appeal.
- → Are there any allergens to consider?
Contains dairy from sweetened condensed milk and may have hidden gluten depending on brands; choose gluten-free labeled ingredients to avoid.
- → Can I use different gelatin flavors?
Absolutely, swapping berry or fruit flavors can customize the colors and tastes while maintaining the layered effect.