 Save to Pinterest
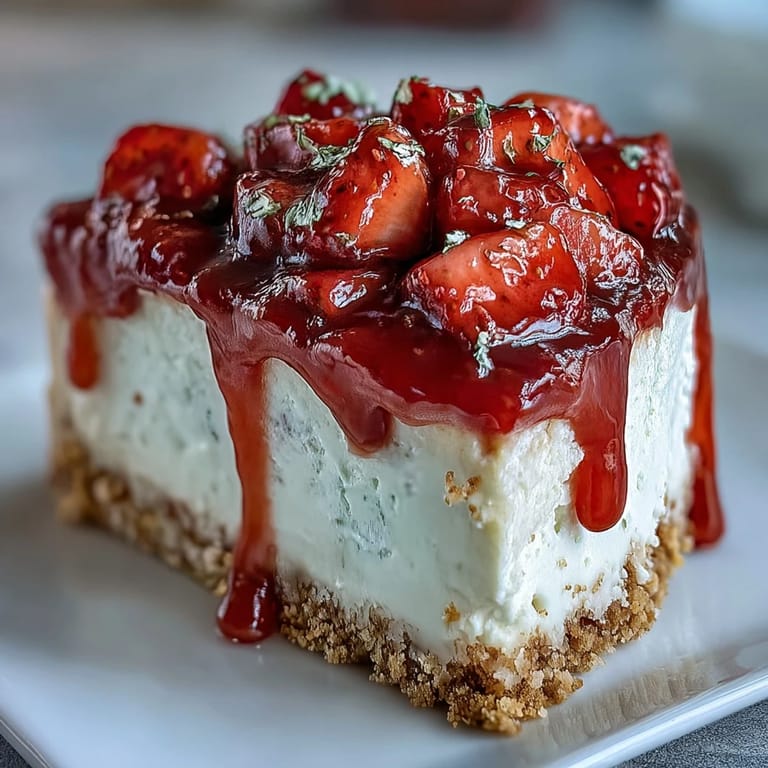
 The first time the fragrant strawberry sauce popped and whispered on my stovetop, I realized dessert was about to outshine dinner. Sunlight poured across the counter as I pressed crumbs into the pan, the familiar, buttery scent promising something carefree and summery. There’s an honest kind of luxury to a no-bake cheesecake: creamy, dreamy, with just enough practical ease that you might make it on an ordinary Tuesday. It’s possible I licked the spatula when no one was looking—a chef’s privilege, I suppose. My kitchen filled with the anticipation only strawberries and cream can deliver.
Last spring, I showed up at a friend’s baby shower balancing this cheesecake in a box, dodging the wind and a suspicious neighborhood cat. The laughs over my struggle melted away as everyone took that first chilled, tart-sweet bite, and I got tagged as the dessert MVP. There’s something undeniably fun about serving slices straight from a springform pan, slightly imperfect edges and all. Gathering compliments on the crust’s crunch and that little zing of lemon became part of the event itself. It’s a treat that turns a baking shortcut into the highlight of the afternoon.
Ingredients
- Graham cracker crumbs: Getting these nice and fine creates a crust that holds together and snaps perfectly—nonna always insisted on a couple extra pulses in the processor.
- Unsalted butter: Melted and mixed in, it binds the crumbs and brings a subtle richness that lifts the entire base.
- Granulated sugar (for crust): A touch is all you need here to keep the crust from tasting flat; too much makes it overwhelming.
- Cream cheese: The secret is letting it soften fully—you don’t want any lumps hiding in your filling.
- Heavy cream: Whipped to stiff peaks, it transforms the cheesecake into a mousse-like dream that feels luxurious but light.
- Powdered sugar: This blends in smoothly, unlike granulated sugar, which can make the filling grainy if you rush it—trust me, I’ve tried.
- Vanilla extract: Just a teaspoon, but its aroma makes the whole kitchen smell like anticipation.
- Lemon juice: It wakes everything up with a gentle tang—don’t skip it, even if you think it sounds strange.
- Fresh strawberries: The topping is all about their juiciness, so go for ripe ones that stain your fingers as you slice.
- Granulated sugar (for topping): This helps draw out the strawberries’ syrup—don’t hesitate to taste and adjust as you cook.
- Lemon juice (for topping): Brightens the berry sauce so it tastes as fresh as it looks.
- Cornstarch: Mixed with water, it thickens the sauce just enough to cascade beautifully over each cheesecake slice.
- Water: Just a splash, but it’s essential for getting the cornstarch lump-free and working its magic in the sauce.
Tired of Takeout? 🥡
Get 10 meals you can make faster than delivery arrives. Seriously.
One email. No spam. Unsubscribe anytime.
Instructions
- Press the crust:
- Tumble your graham crumbs, butter, and sugar into a bowl, then swirl it all together until everything looks like damp sand. Working carefully, press this mixture into the bottom of your pan—use the base of a measuring cup for firm, even pressure—and slide it into the fridge to chill.
- Make the creamy filling:
- In a roomy bowl, beat your softened cream cheese until it’s velvety smooth (and not a lump in sight). Add powdered sugar, vanilla, and lemon juice, and beat again until the scent makes you want to dip in a finger.
- Whip the heavy cream:
- Pour cold heavy cream into a separate bowl and whip until stiff peaks curl defiantly upwards—overbeating and you’ll notice it turning a bit grainy, so keep a close eye. Fold this gently into the cream cheese mix, taking care not to collapse all that lovely airiness.
- Fill, smooth, and chill:
- Scoop the filling over your chilled crust, smoothing the surface with a spatula like frosting on a birthday cake. Cover and let the whole pan rest in the fridge for at least 6 hours: this patience pays off, promise.
- Simmer the strawberry topping:
- In a saucepan, bring strawberries, sugar, and lemon juice to a gentle simmer—when the berries soften and glossy juices appear, you’re on track. Mix cornstarch with water, pour it in, and stir as the sauce thickens and takes on a beautiful gel-like shine.
- Assembly and serve:
- Wait till the topping is cool, then spoon generously over the set cheesecake just before serving. Carefully free the cheesecake from its springform pan and let each slice show off that dazzling scarlet sauce.
 Save to Pinterest
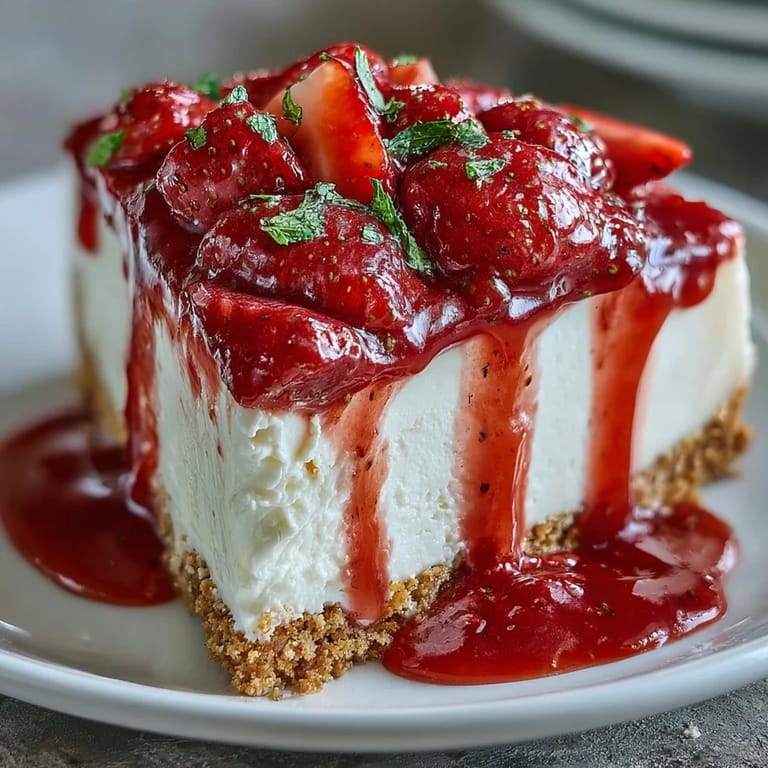
 Watching friends argue over the last remaining slice, all manners abandoned, was the moment I realized this cheesecake might be irresistible. It somehow managed to taste like summer itself, radiating through cool kitchen air even as late-night laughter lingered around the table.
What to Serve with Your Cheesecake
If you’re feeling extra celebratory, I recommend pairing slices with iced coffee or a tart lemonade. More than once, I’ve dropped a few mint leaves on top for a hint of green that makes the berries pop. Sometimes I sneak in shavings of white chocolate for a little extra decadence, especially when I want jaws to drop. And honestly, it’s hard to beat with a handful of not-quite-ripe blueberries if you’re low on strawberries.
How to Store This No-Bake Cheesecake
After a couple of trial-and-error incidents with leaky foil, I now use a tight-fitting lid or heavy-duty plastic wrap to keep leftovers fresh. Stored in the fridge, the cheesecake retains its dreamy texture for up to three days (if it lasts that long). If your topping starts to weep a bit, just blot with a paper towel before serving—no one will be the wiser.
Cheesecake Troubleshooting (Because It Happens)
No recipe is immune from mild disasters, and this one keeps you on your toes.
- If your crust feels a little loose, a few extra minutes in the fridge can work wonders.
- If lumps sneak into your filling, blend it a minute longer—they’ll vanish.
- Only add the topping right before serving; it keeps the layers looking picture-perfect.
 Save to Pinterest
 If you find yourself sneaking out another chilled slice after midnight, you’re definitely not alone. This no-bake strawberry cheesecake is undeniably worth the wait and always disappears before you’re ready to say goodbye.
Recipe Frequently Asked Questions
- → Can I make it gluten-free?
Yes. Substitute gluten-free graham crackers or crushed gluten-free cookies for the crust and proceed the same way. Ensure all packaged ingredients are labeled gluten-free.
- → How long should it chill to set properly?
Chill at least 6 hours for a firm texture, though overnight refrigeration gives the best sliceability and flavor melding.
- → How do I prevent a soggy crust?
Press the crumb mixture firmly and evenly into the pan and refrigerate before adding the filling. Using the right butter-to-crumb ratio helps bind the base; chilling rather than overworking the crust preserves crunch.
- → Can I use frozen strawberries for the topping?
Yes. Thaw and drain excess liquid, then cook the berries with sugar and cornstarch. Frozen berries may release more juice, so simmer a little longer to reach a glossy, thickened sauce.
- → How do I get an extra-smooth filling?
Beat softened cream cheese until completely smooth before adding sugar and lemon. Whip the cold heavy cream to stiff peaks separately and fold gently to retain air and a light texture.
- → How should leftovers be stored and how long do they keep?
Cover and refrigerate leftover slices for up to 3–4 days. The topping and filling hold well chilled; freezing is possible but may change texture, so thaw slowly in the fridge if needed.