 Save to Pinterest
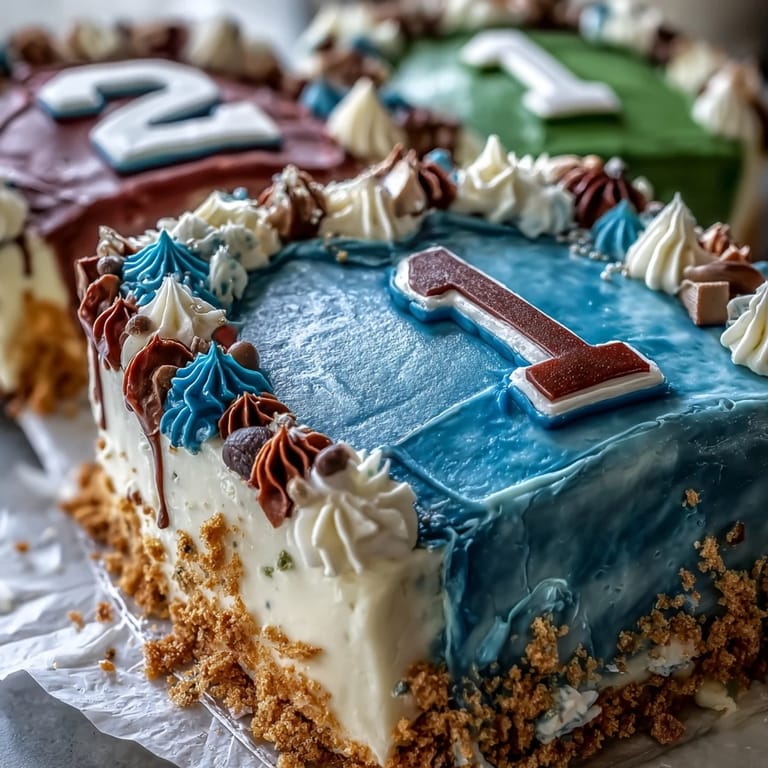
 The vivid colors and playful shapes of celebration cakes always fill the kitchen with anticipation, but the day I tried my hand at the Graduation Sports Jersey Cake was more like an experiment in edible art. As I rolled the fondant and adjusted the food coloring, the hum of the mixer blended with laughter from the living room—proof that a little culinary chaos can spark excitement. When I first saw a jersey cake at a school bake sale years ago, I was struck by how much it looked like a real shirt, and I wondered if I could pull off something so cheerful for my nephew's graduation. That curiosity led me here, elbows deep in flour and butter, hoping my design would impress. Nothing quite beats the moment when a cake becomes both dessert and centerpiece.
One spring afternoon, armed with an oversized apron and a playlist of pep band favorites, I baked this cake for my brother's graduation. As my family crowded around to watch me carve those jersey curves, my sister joked I was auditioning for a bake-off TV show. The buttercream seemed to disappear as quickly as I spread it, but I managed to sneak in his team colors and jersey number nonetheless. That moment taught me how food can transform ordinary gatherings into joyful milestones. Even now, people recall the cake before they talk about the ceremony.
Ingredients
- All-purpose flour: I measure carefully with an old ceramic cup, making sure each scoop is leveled for consistent texture.
- Baking powder: That fluffy rise comes from fresh baking powder; I always check the expiry date before using it.
- Salt: A pinch enhances the flavors so the cake never tastes bland; sea salt gives a subtle, cleaner taste.
- Unsalted butter: It needs to be softened but not melted—room temperature is ideal for smooth batter and silky buttercream.
- Granulated sugar: I find that beating it extra long with butter helps achieve fine crumb and sweetness without grittiness.
- Eggs: Cracking eggs one at a time into a separate bowl avoids any shell mishaps in the batter.
- Whole milk: Full-fat milk guarantees a richer cake, and I always warm it slightly for better blend.
- Vanilla extract: Pure vanilla lends depth; I sometimes sneak in an extra splash when baking for someone special.
- Powdered sugar: Sifting ensures there are no clumps in the buttercream, making it easier to spread.
- Food coloring gel: The gels create vibrant colors without compromising fondant texture; gloves are a must for keeping hands stain-free.
- White fondant: Rolling fondant on cornstarch gives a smooth finish—never flour, which dries it out.
- Cornstarch: Essential for dusting surfaces when rolling out the fondant.
- Edible black marker or black fondant: For sharp jersey details; I practice drawing numbers on parchment first.
Tired of Takeout? 🥡
Get 10 meals you can make faster than delivery arrives. Seriously.
One email. No spam. Unsubscribe anytime.
Instructions
- Set the Stage:
- Start by preheating your oven to 350°F (175°C), letting the warmth fill the kitchen and prepping your 9x13-inch cake pan with parchment and a swipe of butter.
- Mix Dry Ingredients:
- In a bowl, whisk together flour, baking powder, and salt until airy — watch how the powder floats and mingles.
- Cream Butter & Sugar:
- Beat the softened butter and sugar until pale and fluffy, listening for that change in sound as the mixture transforms.
- Add Eggs & Vanilla:
- Crack in the eggs one at a time; each goes in smoothly now and ensures your cake rises evenly, then blend in sweet vanilla.
- Combine & Pour:
- Alternate adding the flour mix and milk, just until the batter is silky and streak-free — overmixing is the enemy.
- Bake:
- Batter goes into the prepared pan, and after smoothing the top, it's ready to bake for 35–40 minutes, until golden and aromatic; test with a toothpick.
- Buttercream Prep:
- Whip up the buttercream by beating butter till creamy; add powdered sugar slowly, with vanilla and milk, until it's light and billowy.
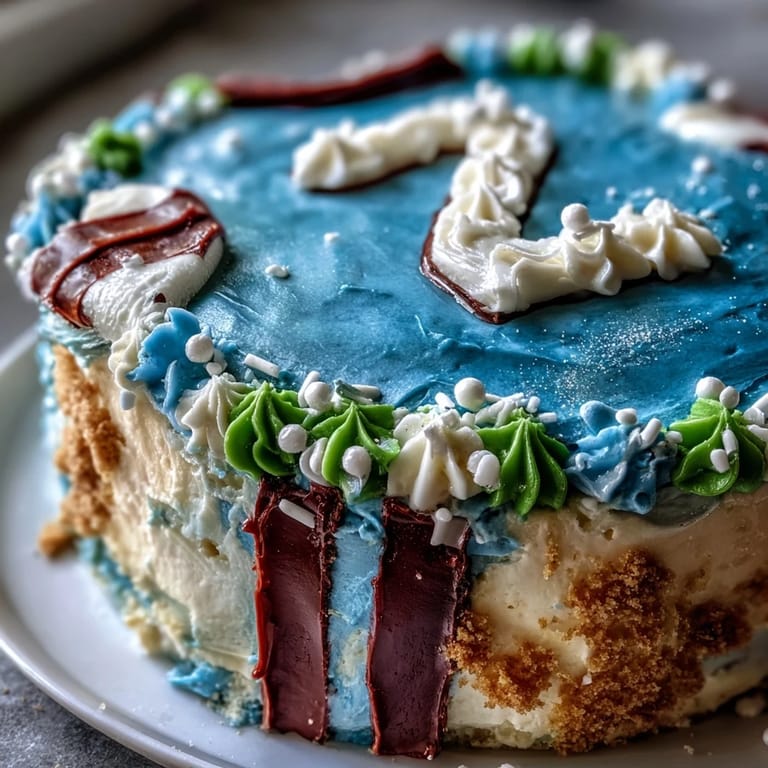
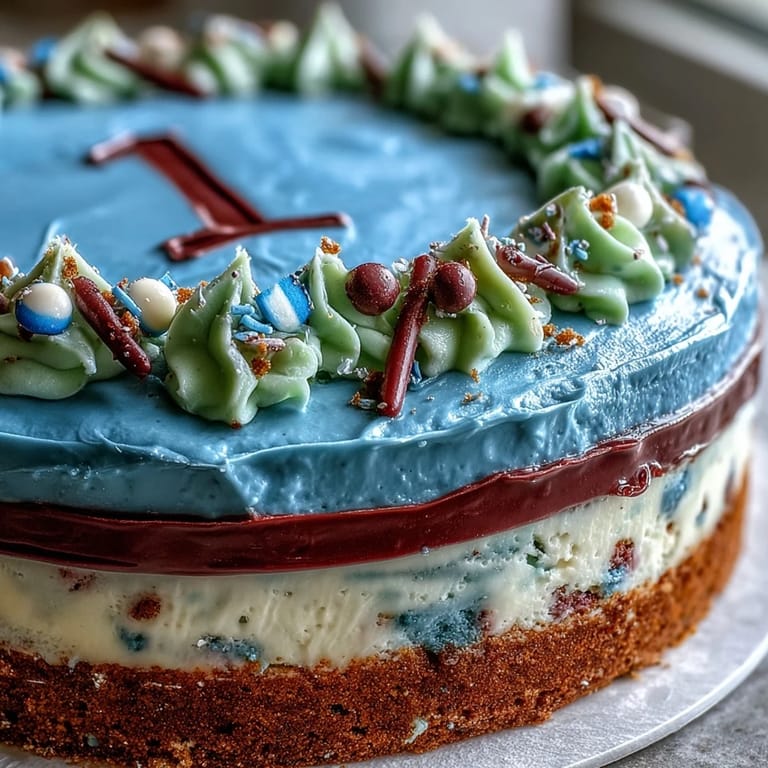
- Shape the Jersey:
- After cooling, gently remove the cake. Use a serrated knife and sketch out curved shoulders and armhole indents like an artist at work.
- Crumb Coat:
- Layer on a whisper-thin coat of buttercream to seal in crumbs, chilling for 30 minutes so it sets firm.
- Color & Roll Fondant:
- Knead fondant with color gels — it's messy but fun. Roll it out thinly, dusting the counter with cornstarch.
- Cover & Decorate:
- Drape the fondant gently over the chilled cake, smoothing with your hands or a fondant tool, then trim the excess for a crisp outline.
- Personalize:
- Add stripes, collar, name, number, and graduation year with food-safe markers or colored fondant pieces; this step is pure creativity.
- Display:
- Carefully transfer your finished jersey cake onto a board—hold your breath and admire your handiwork!
 Save to Pinterest
 The first time a guest asked if I'd bought the cake, I nearly blushed with pride—it was a moment that reminded me how a handmade dessert can become a memory itself. Photos of the jersey cake made rounds among friends, and soon I found myself offering to bake for other milestones, each version a little more daring than the last.
Fondant Adventures: Finding Your Color Palette
Getting the color right is part science, part luck. A pinch of gel makes a world of difference, and sometimes blending two shades yields a perfect team hue you didn't expect. I keep food-safe gloves handy so my hands don't look like I've been finger painting for days. It's also worth mixing colors in advance to let them settle for more consistent saturation. Whenever the fondant is too sticky, a dusting of cornstarch restores its elasticity.
Working with Buttercream
Buttercream is forgiving, but only when it's properly whipped and cool. If mine gets streaky or thin, I add a spoonful of powdered sugar and beat it again—a trick learned after one too many sliding layers. I use an offset spatula for a smooth crumb coat, then chill the cake so there aren't any surprise crumbs poking through the fondant. Leaving a little extra buttercream aside is handy for last-minute patching, especially after decorating mishaps.
Serving Success: How to Slice and Store
Serving the jersey cake always makes for lively conversation as people try to figure out where to cut first. I recommend using a sharp, serrated knife and wiping it between cuts for neat slices. Fondant can dry out quickly, so covering leftovers with plastic wrap is crucial. For best taste, store the cake in a cool place and let it come to room temperature before eating.
- Plan your jersey design before the cake comes out of the oven.
- Keep extra fondant on hand in case you need touch-ups.
- Don't rush transferring the cake; use a large spatula for stability.
 Save to Pinterest
 Making a Graduation Sports Jersey Cake has become a highlight of our family celebrations—a sweet salute to achievement, effort, and the simple joy of sharing something hand-crafted. May your next cake turn into a centerpiece worth remembering!
Recipe Frequently Asked Questions
- → How do I shape the cake into a jersey?
Once cooled, carve the cake into a rectangle with curved shoulders and side indentations for armholes, resembling a sports jersey.
- → What colors can I use for fondant?
You can tint fondant with food coloring gel to match the graduate’s preferred team or school colors.
- → Can I personalize the cake?
Yes, use edible markers or colored fondant to add the graduate’s name, team number, stripes, or graduation year.
- → Are there flavor variations?
Switch ¾ cup of flour for cocoa powder to make a chocolate version and pair with vanilla buttercream.
- → What allergies should I be aware of?
This cake contains wheat, eggs, and dairy. Fondant may have traces of nuts; check packaging for allergen info.
- → What tools are needed for decorating?
You will need an electric mixer, cake pan, rolling pin, mixing bowls, knife, offset spatula, and fondant smoother.