 Save to Pinterest
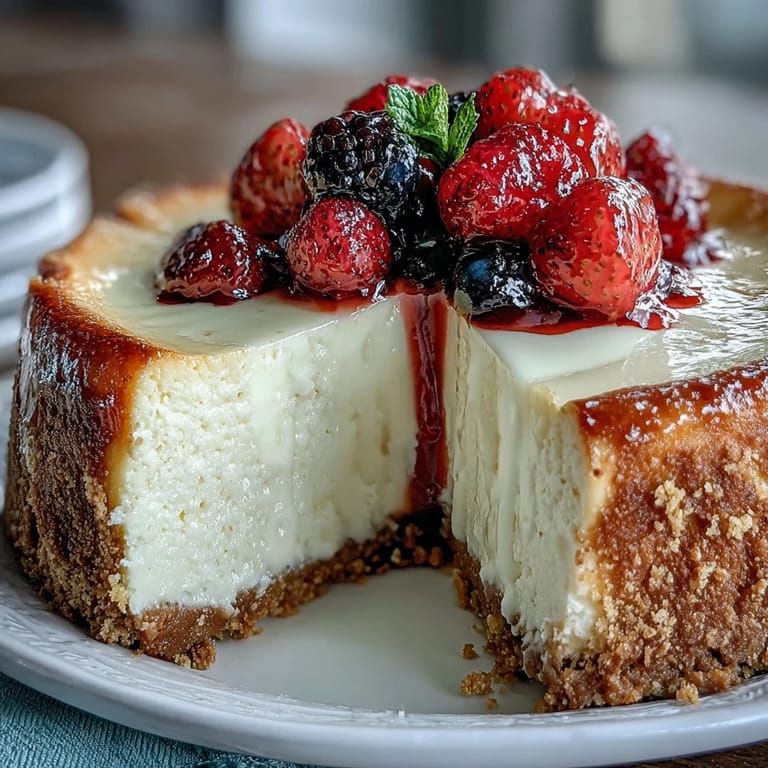
 My neighbor knocked on my door one April afternoon with a problem: she'd volunteered to bring dessert to a garden party the next day but had no oven. I pulled out six mason jars from my cabinet and started layering graham cracker crumbs with lemon-kissed cream cheese, and by the time we finished, she was laughing about how she'd stumbled onto something better than what she'd originally planned. No-bake lemon cheesecake in jars became her signature move after that, and honestly, mine too.
There's something magical about layering dessert in clear jars—you can see exactly what you're getting, and somehow that makes it taste better. My kids used to press their noses against the glass at the farmers market when I'd bring these to sell, and I'd always have to make extra because people would buy them just to look at them.
Ingredients
- Graham cracker crumbs (1 cup): The foundation needs to be packed firmly so it doesn't crumble into the filling when you bite down, and this amount gives you the right proportion for six jars.
- Unsalted butter (3 tbsp melted): Melted butter distributes evenly through the crumbs and holds everything together without adding any salt that might fight with the lemon.
- Granulated sugar (2 tbsp): Just enough to add sweetness to the crust layer without making it crunchy or competing with the filling.
- Heavy whipping cream (1 cup cold): Cold cream whips to stiff peaks faster and holds its shape longer, which is the secret to that fluffy, cloud-like texture.
- Cream cheese (8 oz softened): Let it sit on the counter for an hour before you use it, otherwise you'll spend forever beating out lumps and your arm will get tired.
- Powdered sugar (1/2 cup): It dissolves into the cream cheese smoothly without adding grittiness, unlike granulated sugar.
- Fresh lemon juice (1/4 cup): Use fresh lemons, never the bottled stuff—the difference in brightness is worth the two minutes of squeezing.
- Lemon zest (1 tbsp): Zest the lemon before you juice it, and don't press down on the grater or you'll get bitter white pith along with it.
- Pure vanilla extract (1 tsp): A small amount rounds out the flavors and keeps the lemon from tasting one-dimensional.
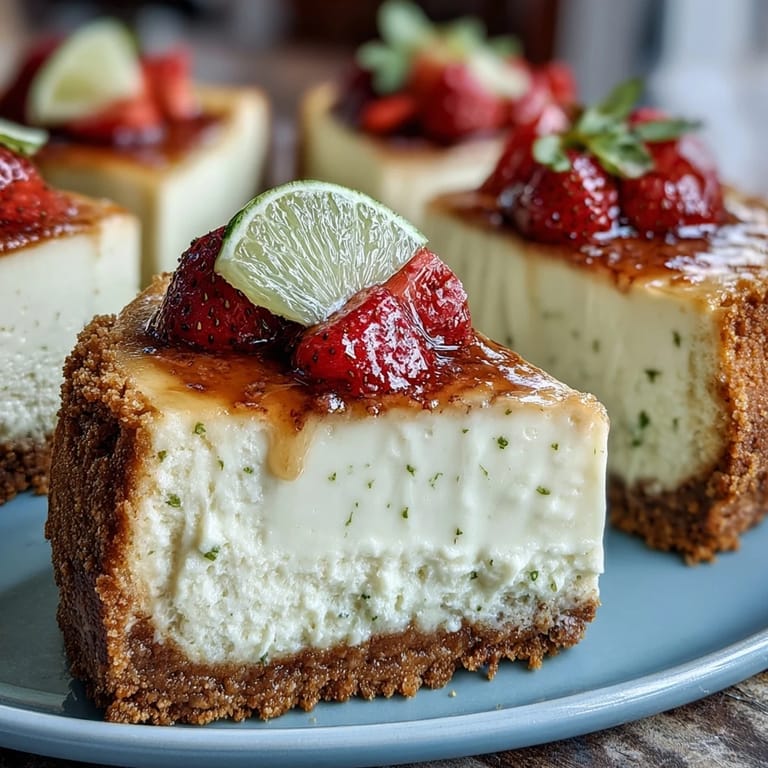
- Lemon curd (1/2 cup): This tangy topping is what makes people close their eyes and sigh when they taste it.
- Fresh berries and extra zest for garnish: These add brightness and make each jar look like it came from a fancy bakery.
Tired of Takeout? 🥡
Get 10 meals you can make faster than delivery arrives. Seriously.
One email. No spam. Unsubscribe anytime.
Instructions
- Make the crust base:
- In a bowl, mix graham cracker crumbs with melted butter, sugar, and a pinch of salt until it feels like damp sand between your fingers. You'll know it's ready when you can squeeze it and it holds together slightly.
- Layer the crust:
- Spoon exactly 2 tablespoons of crust mixture into each jar and press down firmly with the back of a spoon or your thumb—this creates an even, compact layer that won't shift when you add the filling. Take your time with this step because a wobbly crust layer makes the whole thing feel less elegant.
- Whip the cream:
- Pour cold heavy cream into a bowl and beat it with a mixer until stiff peaks form, which usually takes 2 to 3 minutes. You'll know it's ready when the peaks stand up straight and don't flop over when you lift the beaters.
- Prepare the filling base:
- Beat softened cream cheese until it's smooth and creamy, then add powdered sugar, lemon juice, lemon zest, and vanilla extract. Mix until combined, but don't overbeat or you'll end up with a grainy texture.
- Combine and lighten:
- Gently fold the whipped cream into the cream cheese mixture with a spatula, using a motion that brings the heavy mixture up and over the light cream rather than stirring it aggressively. Stop as soon as you don't see white streaks anymore so you keep all those delicate air bubbles.
- Fill the jars:
- Spoon or pipe the fluffy cheesecake filling over each crust layer, dividing it evenly among the six jars. If you're piping, it takes a few extra minutes but looks more polished when you serve them.
- Add the lemon curd layer:
- Top each jar with a generous spoonful of lemon curd, which creates a beautiful golden stripe and an extra punch of lemon flavor. Press it down slightly so it doesn't slide around when people pick up the jars.
- Chill and set:
- Cover the jars and refrigerate for at least 2 hours—this gives the flavors time to meld and the filling time to firm up slightly so it's not too soft. I usually make mine the evening before and let them chill overnight, which actually makes them taste better.
- Finish with garnish:
- Just before serving, top each jar with a small handful of fresh berries and an extra pinch of lemon zest. This step transforms them from pretty to showstopping.
 Save to Pinterest
 I served these at my best friend's bridal shower last May, and her mom asked for the recipe right there while holding a spoonful halfway to her mouth—that's when I knew they were a keeper. There's something about sharing food in jars that feels intimate, like you're giving someone something they could carry home and think about you while eating it.
Why Individual Jars Change Everything
Serving dessert in a jar means each person gets their own complete experience without you having to cut or plate anything at the last minute. The crust stays crisp, the layers look beautiful through the glass, and there's something psychologically satisfying about eating straight from your own little glass vessel—it feels less formal and more fun than a plated dessert.
The Lemon Flavor Balance
Too much lemon juice and your filling tastes like battery acid; too little and it tastes like generic cheesecake with a hint of lemon. The secret is using both juice and zest—the zest gives bright, floral notes while the juice adds tartness, and together they create depth instead of a flat, sour punch. I learned this the hard way by experimenting through several batches, and now I never second-guess the measurements.
Storage and Make-Ahead Magic
These jars actually improve after sitting in the fridge overnight because the graham cracker crust softens slightly while the filling sets more firmly, creating a perfect textural balance. You can refrigerate them for up to three days, and if you're bringing them to an event, just keep them cold in a cooler and they'll travel beautifully without spilling.
- Make these up to 24 hours before you need them and the flavors will be even more cohesive.
- Transport them in a cardboard box lined with a towel so the jars don't clink together.
- If you prefer a gluten-free version, swap in gluten-free graham crackers and everything else stays exactly the same.
 Save to Pinterest
 These jars have become my go-to when I need something beautiful but don't want to spend hours in the kitchen. They're proof that the simplest desserts, made with real lemon and genuine care, are often the ones people remember.
Recipe Frequently Asked Questions
- → How do I make the crust for the cheesecake jars?
Combine graham cracker crumbs, melted butter, sugar, and a pinch of salt. Press the mixture firmly into the bottom of each jar to form an even layer.
- → Can I substitute ingredients for a richer filling?
Yes, replacing cream cheese with mascarpone adds a richer, creamier texture while maintaining the lemon flavor.
- → What is the best way to achieve stiff peaks with the cream?
Chill the heavy whipping cream before whipping and use a cold bowl and beaters for best results when whipping to stiff peaks.
- → How long should the jars be chilled before serving?
Refrigerate the jars for at least 2 hours to allow the filling to set properly and develop a firm texture.
- → Are there gluten-free options for the crust?
Yes, substitute regular graham cracker crumbs with certified gluten-free cookie crumbs to make the crust gluten-free.